One day I was going out with some friends and in need of a cool hair do. So what did I do you ask? I strolled through Pinterest, looking for hair tutorials. I found a few, but one really stuck out to me its from The Beauty Department, check it out!
AND here it IS!!!!
Steps:
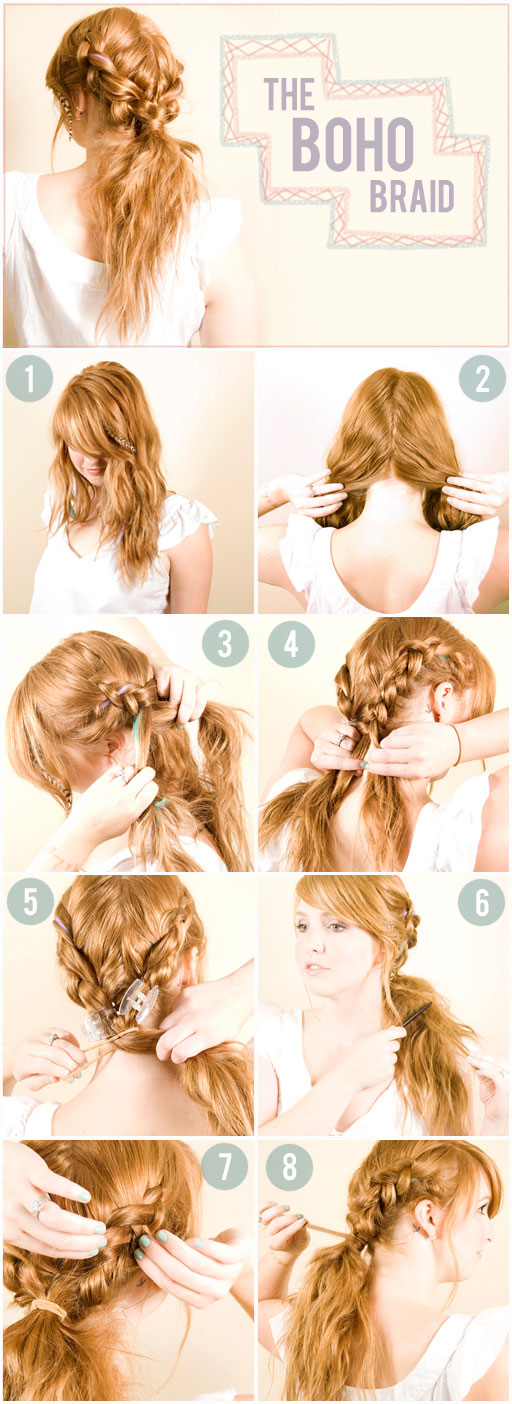
1. Start with wavy hair. If your hair is naturally straight, curl some sections to give it texture.
2. Separate the hair on the left & right sides of your head. Using your part as a guide, continue the part down the middle of the back of your head. To maintain the effortless, imperfect look, use your fingers instead of a comb. Tie one section with a hair tie to keep it out of the way.
3. French braid the free section of hair back to the nape of your neck & secure with bobby pins or a clip. To add more texture, try a Reverse French braid: Alternate crossing the 2 outer sections of hair UNDER the middle section instead of over. To make the look more free-spirited, leave out bangs & short layers around your face.
4. Repeat Step 3 on the other side of your head, clipping the French braid at the nape of your neck.
5. Gather the hair into a low ponytail below the clips & secure with a hair tie. When the ponytail is secure, remove the clips from the braids.
6. Time to add some volume! With your fine tooth comb, tease 1” sections of hair where they come out of the pony tail, keeping the ends less distressed, & secure with a medium hold hair spray.
7. Create more volume & texture in the braids by lightly pulling the loops apart with your fingers.
8. To finish the look, wrap a section of hair from underneath the pony tail around the hair tie. Secure with bobby pins.
I skipped step 8. I especially liked the suggestion to pull the loops apart to create volume. BRILLIANT! why could I not have come up with something like that. I also liked this a lot because I am really good and french braiding my own hair, so this was pretty easy.
Linking to: A creative Princess. House of Hepworths. Somewhat Simple.


No comments:
Post a Comment