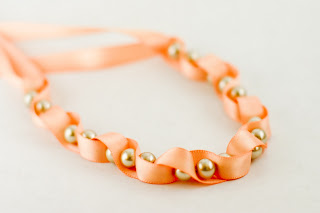
Scrolling through the internet I stumbled upon this beautiful picture.
Oh, I instantly feel in love. And wahoo there is a tutorial for it too!!!!! It was my lucky day.
A day or two later I went out and got the materials I needed. Ribbon and stands of pearls. And at hobby lobby together they were 1.50 before tax. So it was worth it.
Anyways...
I gathered all of my materials:
- ribbon
- strand of pearls
- embroidery thread
- needle
I began by measuring out 2, 36 inch strands of ribbon. At about 10 inches in I crossed the ribbon and threaded the needle through, then tied a knot and was ready to begin beading.
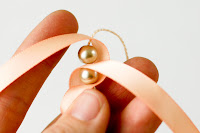
Bead one pearl, then cross a long ribbon end over the pearl, and thread through. Be careful, you want the thread to sit nicely on top of the pearl, no excess and no stretching. You want the ribbon to fall nicely on top of the pearls.
Thread the second pearl, and cross the other long strand of ribbon over this second pearl. It should look like this:
Then you repeat, alternating the ribbons after you add a pearl.
When you find the length that you like you stop, make a small knot at this point, then re-thread through the last three or four beads, and make a small knot that it is hidden in the strands.
After that I knotted the ends right after the pearls ended. Then made small knots the remaining length of the strands.
To attach it, I put a safety pin at the end as a closure. This also allows me to adjust the length of the necklace. The original tutorial has a better (more professional) way to complete the necklace, which you can check out here.
This is one of the prettiest necklaces I have made. But I am not going to make another one. It was somewhat frustrating to make because the necklace kept moving, the beads were slick, and I could not always tell how much ribbon to use so that it would sit nicely over the pearls. This necklace was a lot of trial and error.


No comments:
Post a Comment